The House on the Hill

Renovating a house from the 70s in the South.

  • Home
  • About
  • Get In Touch
  • House Tour

2020 Project Plans: Our “Finish It” Year!

January 4, 2020

Warning: This is going to be a very long post full of photos, plans, and to-do lists.

I’ve never been great at posting regularly on the blog but I think 2019 is the first year that I’ve had multiple months with no posts. I’m hoping to get into a somewhat regular posting schedule (at least twice a month) for 2020 but as always, no promises!

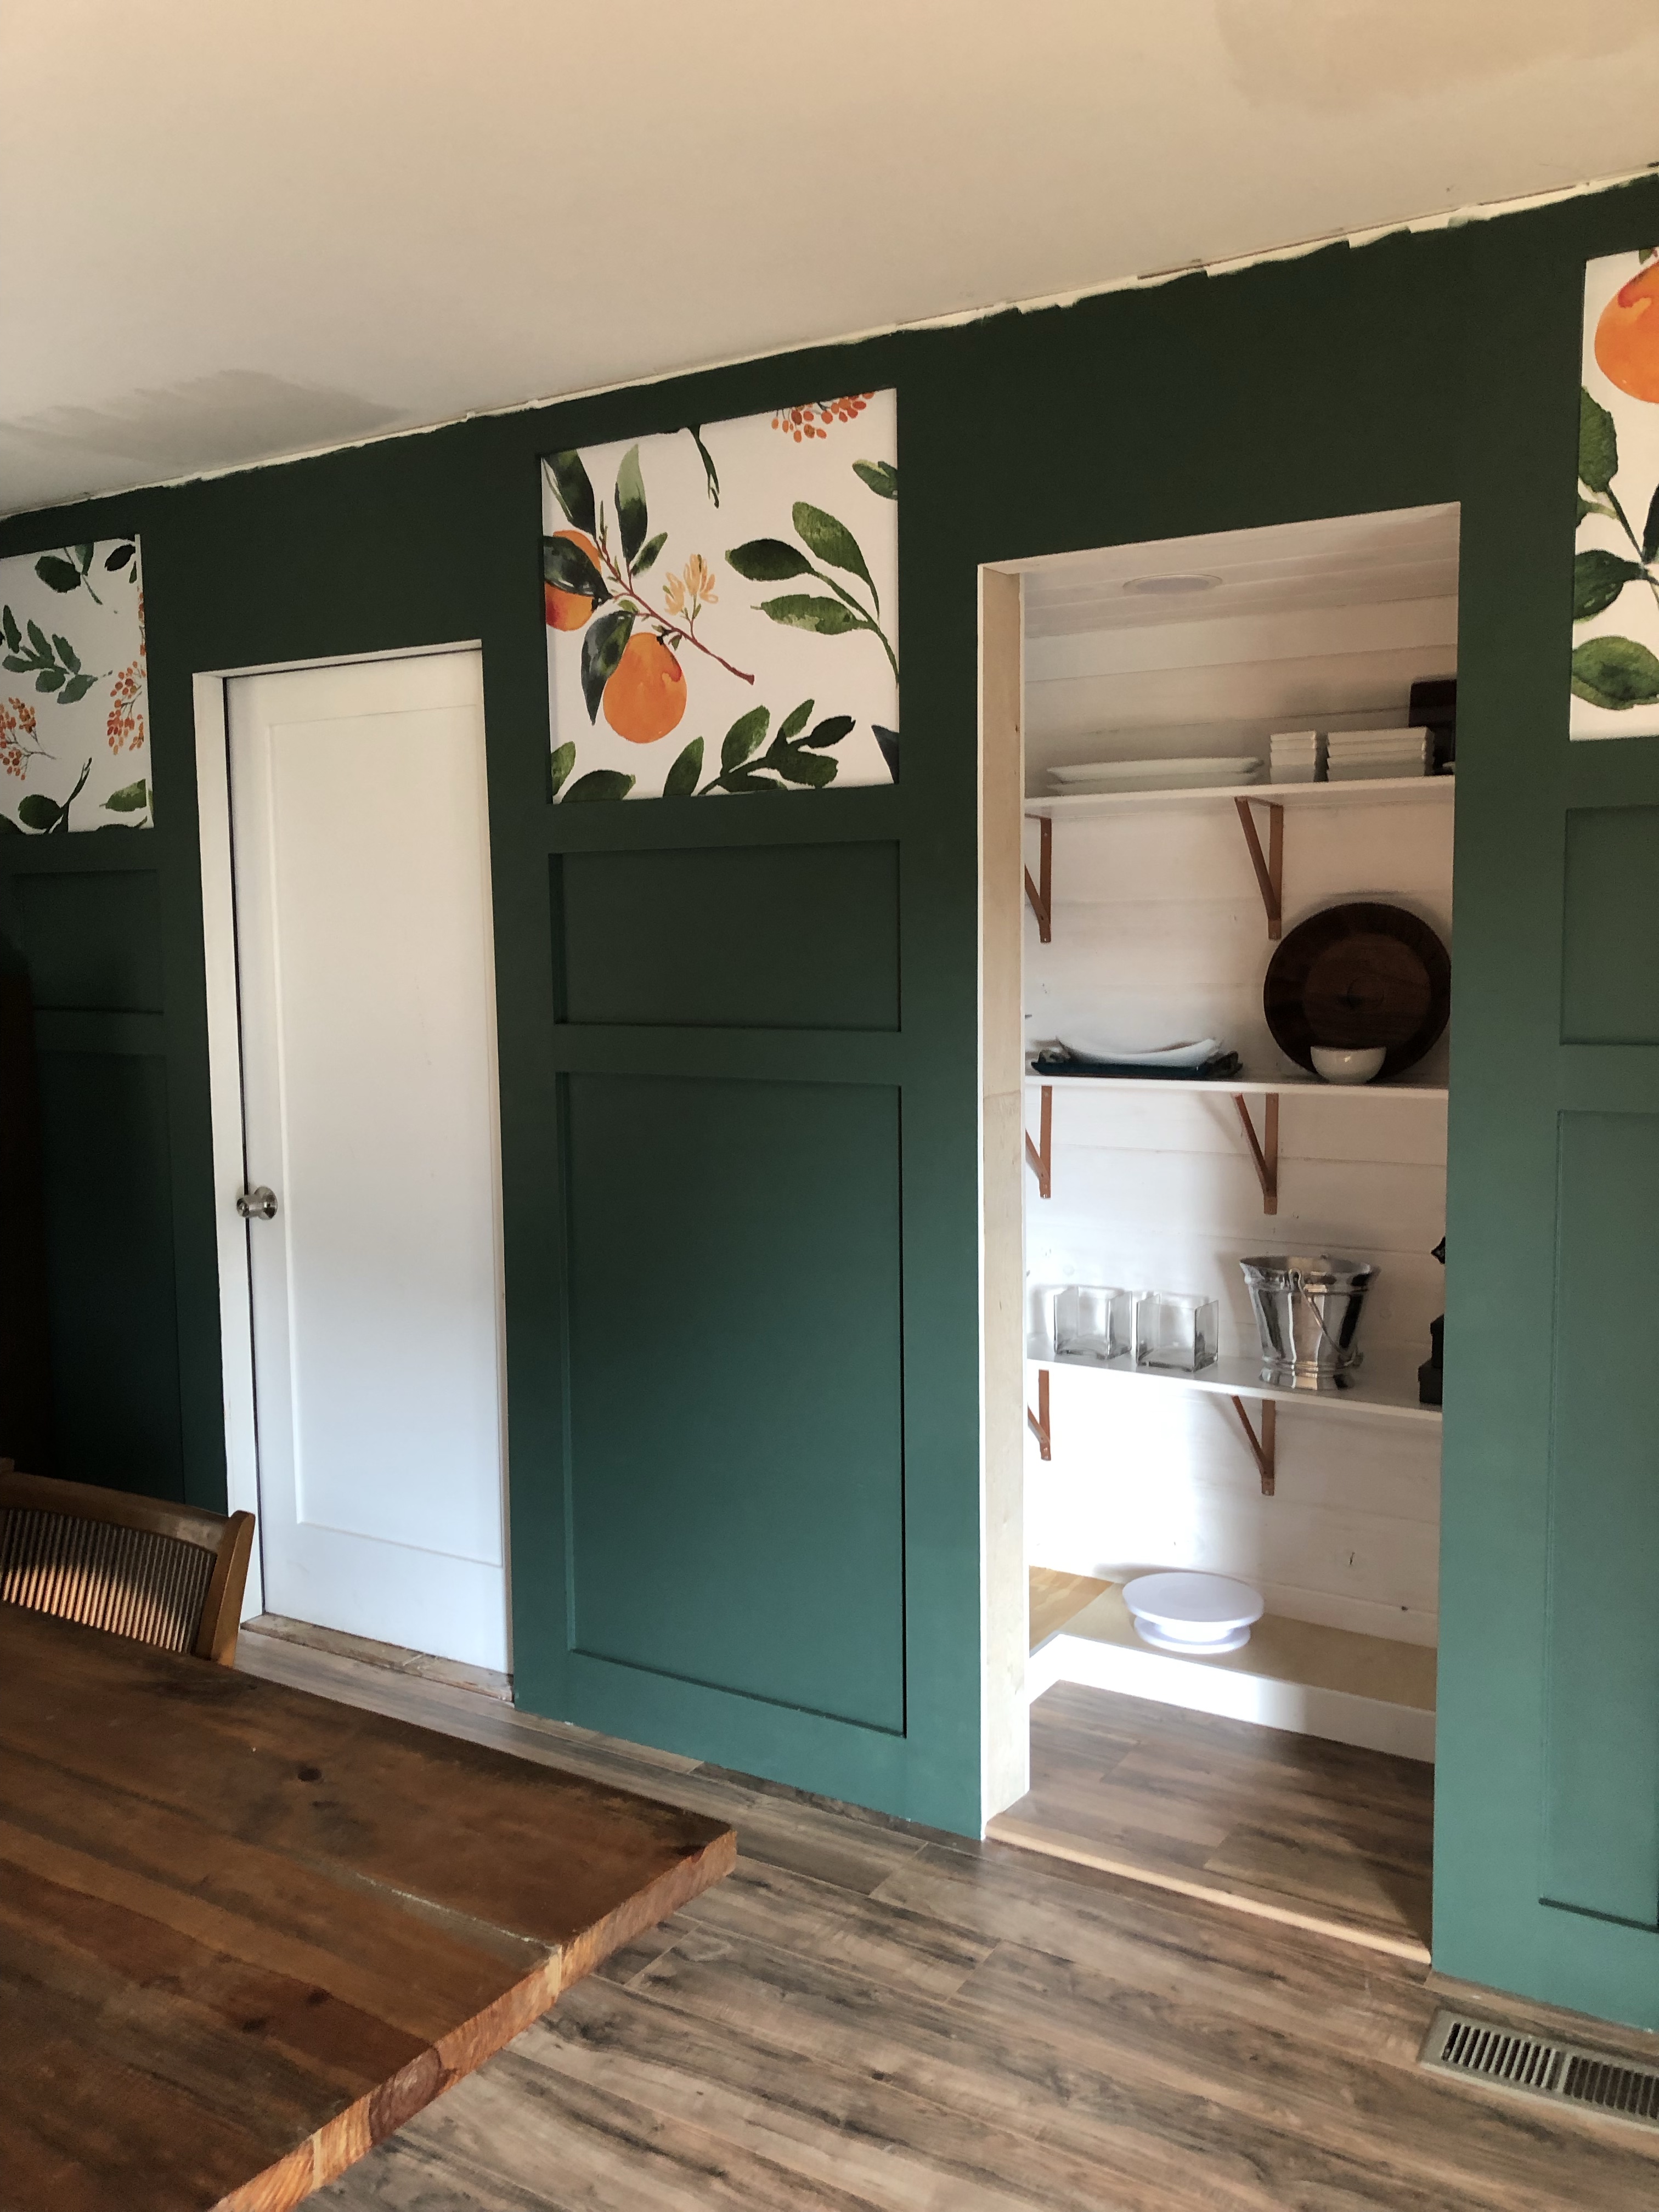
2019 was basically bad news after bad news and because of that, we didn’t actually finish or even start on any of our 2019 projects (which were really just finishing 2018 projects). We did unexpectedly demolish our kitchen in May or June and have slowly been rebuilding it and we completely made over our dining room and added a new walk in pantry that houses all of our entertaining and serving dishes so it wasn’t an entirely unproductive year, just different than what we expected.

I’m not usually one to wish time away but I could not wait for 2019 to end and I’m ready for a more positive year in 2020 which we have dubbed our “Finish It” year. We have 8 spaces in our house that are in some state of project limbo that we have decided to finish this year. These aren’t all of our partially finished projects but I think it covers all of the “in progress” spaces on the inside of the house and one exterior area.

Here they are in no particular order (although the kitchen and dining room/pantry are the first three spaces we plan on finishing):

Kitchen

The kitchen is #1 on the priority list to finish after we host OG’s birthday party next weekend. We’ve come a very long way on this Phase One renovation but we still have several things to finish.

In case you’re new here or these images haven’t been burned into your brain, here are some listing photos from before we moved in:

Listing_Kitchen

Listing_KitchenSink

Listing_KitchenStove

Listing_KitchenFridge

We immediately painted all of the cabinets white and lived with that version of the kitchen for almost exactly 6 years:

kitchen

Then, we decided to replace the tile to run laminate floors in the dining room through to the kitchen and found a ton of water damage and mold that went under the cabinets. We decided the best thing to do was to completely demolish the kitchen including some of the sub-floor and drywall.

img_4054

Then, we very slowly started rebuilding the kitchen on a teeny tiny toddler sized shoe string budget. The last time I posted about it, it looked something like this:

img_6103

We are much further along now and I’m hoping to get some current photos up soon. Here are the things that we need to do to finish:

  • Drill out, install, and stain the remaining floating shelves
  • Finish counter installation, including waterfalls at ends and small counter on the pantry wall
  • Prime and paint ceiling
  • Fix crooked faux drawer on sink cabinet
  • Install, patch, sand, paint toe kicks for bases and pantry and microwave cabinets
  • Finish installing, patching, sanding all trim work
  • Paint all trim
  • Figure out window treatment for window over sink
  • Purchase, assemble, and install final cabinet for pantry wall
  • Tile and grout between counter and cabinet on pantry wall using leftover penny tile
  • Install outlet/switch plates.

And here is a list of “might do” items depending on how I feel about how the kitchen looks after we finish the list above. Admittedly, I love the overall concept for the kitchen but some of the pieces just aren’t coming together for me at the moment. I want to see everything above finished before I decide on any of these projects but I want to be completely open and honest and sometimes projects just don’t turn out like you thought they would or you don’t love the result as much as you thought you would.

  • Apply veneer to kitchen counters (not loving the color with the green cabinets)
  • Build new drawer fronts (don’t love how much of the boxes you can see or the style of the fronts)
  • Paint drawers slightly darker green (major maybe; I think fixing the counters would help)
  • DIY panel on dishwasher to make it blend in

Dining Room

The dining room was one of two spaces we started and “finished” in 2019. There are really just a few things we need to do in here for it to be completely finished.

As a refresher, here’s a listing photo:

dining room

Here’s how it sat for many years. Super inviting, I know:

img_2034

And here it is now:

img_0990

We replaced the floors and trim, added two doors to the wall on the right (one to the garage and one to the pantry), changed the fan to a pendant light and then to this gorgeous wood bead chandelier, added batten molding to the walls, and installed removable wallpaper. Thankfully, the “finish it” list in here is pretty small:

  • Install/Paint ceiling trim
  • Paint ceiling (in tandem with the kitchen ceiling)
  • Paint door to garage
  • Trim out cabinets
  • Add curtains
  • Maybe switch out faux wood blinds with something with more texture (like a woven shade or something similar – TBD)
  • Spray paint HVAC register black so it doesn’t stand out so much

We also may need to reinstall one small piece of wallpaper that has started bubbling. Trying to figure out what’s happening there.

Pantry

This little pantry is one of my favorite parts of our dining room makeover. I love having a place for all of my serving dishes and it’s the perfect spot to store my KitchenAid mixer. This closet used to be the home of our cats, their food, and their smelly litter box. We ripped it down to the studs thinking we’d be expanding our laundry room into this area but unfortunately, there is a plumbing stack and lots of electric that would be very expensive to move so instead we built it back up, moved the door from the hallway (which was super inconvenient) to the dining room and made it into a small butler’s-type pantry.

Here it is before:

img_0948

And here it is now:

img_1061

All we need to do in here is:

  • Finish door frame
  • Clean/Paint/Install door (need to fix one pane of glass as well)
  • Install a shelf liner on the bottom shelf
  • Patch/Sand/Paint base trim

Master Bedroom/Closet

Our poor bedroom has never been a priority. At some point we removed the carpet and put in new floors. We also painted it white and then navy and then we tried to remove the reach in closet that takes up a bunch of space but I guess the builder decided to tie the roof structure of our house into the closet which means it stays. Of course we didn’t know this until we took all of the drywall off and honestly we just didn’t have the motivation or energy to put new drywall up so we used tongue and groove boards painted white instead to make it a “feature.” Our new long term plan is to hopefully expand the hall bath into the closet and close it in on the bedroom side but for now, this is what we want to do:

  • Finish installing small tongue & groove boards on the closet (just need one or two small boards at the very top)
  • Finish painting – originally, we had planned on installing crown but have since decided not to which means I have to take the paint up to the ceiling. We’re also going to paint the tongue and groove boards navy to blend rather than stand out.
  • Touch up paint the ceiling because I’m a messy painter and there are a couple of big navy spots
  • Purchase and install chandelier for the bedroom – we bought a chandelier for in here but it now lives in the dining room
  • Move sconces to new location – we moved our bed to the other side of our room and now that we know we love it there, we need to move our plug in sconces over.
  • Patch where old sconces are currently installed
  • Move couch to family room
  • Build a small walk-in closet – this is a biggie. We don’t have a walk-in closet, we have two reach in closets: one in the bedroom and one in the bathroom sink area. We turned one of our bedrooms into a closet but we’d like to convert it to a home office/gym. Our master bedroom is huge and I love it but we really don’t use all of the space. I always thought we’d create a sitting area and we do have a couch in there but the dogs are the only ones who use it and that’s not often. So, we decided to sacrifice some of the bedroom space to create a closet instead. This project will have a whole to-do list of its own and will probably happen later in the year if all goes to plan.
  • Build art ledge (or two) on new wall – we have so much art and this will give us a place to display some of it once we have the new wall built for the closet (the entrance to the closet will be on the far left end of the wall and will act as the entrance for the bathroom and closet.
  • Bring up free standing electric fireplace from family room and put into current reach in closet “nook”
  • Hook up TV – we have a tv for our room but it’s just sitting around unplugged until we have a place for it.
  • Build a new bed – I love our bed but it’s dark gray which I don’t love against the dark walls. I have an idea that will really end up just being a cover for the headboard but we’ll see if it works out.
  • Add a rug!
  • Add a dresser under the art ledge(s) (either existing or buy new if nothing we have works)

Here’s a couple of listing photos and how it looked for way too long after we moved in. I don’t have any great pictures of what it looks like right now but hopefully I will have some soon! Here’s one little peek into the room from the hallway for now. We need to take down the Christmas tree we have in there and clean up a bunch of old boxes of my childhood stuff my mom passed off to me before I can take any more pictures.

masterbed2

Masterbed1

masterbedroomwaybefore

img_3944

This is probably the biggest project we’ll tackle this year (assuming we aren’t able to work on the master bathroom) but it’s one I’m most excited about. I’m even starting to consider doing some sort of wall treatment or wallpaper (WHO AM I?) but I need to get through the kitchen and dining room before I can really think about it.

Master Bathroom*

*This is a major maybe. It really just depends on our finances and how expensive this project will be.

Here is a listing photo:

masterbath1.jpg

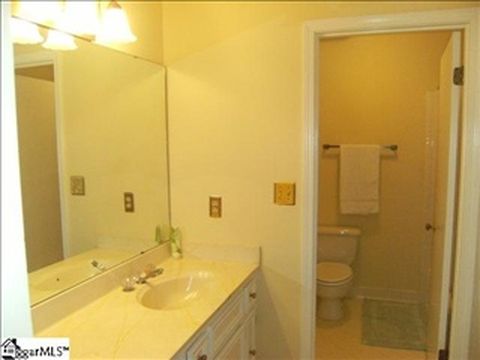
If you’ve been around here long enough, you might remember that back in 2017, just a few months before expecting our first child, we had our master bathroom demolished. We hadn’t been able to use it for a while after finding severe water damage that left our subfloor crumbling next to the tub. Our plan was to rip it out and just make it functional but I’m here to tell you that since it was demoed, it hasn’t been touched. Not at all. Partly because we have another full bathroom and it wasn’t a priority while navigating our lives as new parents and partly because we weren’t really sure how much we wanted to do with it. Do we just make it functional for now and do the big dream bathroom reno later? Or do we just hold off until we can do it the way we want it? To be honest, that’s still what I’m struggling with but as OG gets older it’s becoming very apparent that we need our own space back. Sharing a tiny bathroom with an entire farm’s worth of squeaky rubber animals and bath books plus our 1,200 shampoos and body washes is getting more and more aggravating.

So, at the bare minimum we’d like to try to make it functional this year and if we can do more than that, we’d love to. This is what I hope we can do this year:

  • Have the old tub drain moved – we had a tub/shower combo but would like to move to just a shower for now and add in a free standing tub down the road. We were quoted $600 to re-install the existing tub and $1,800 to move the drain. Doesn’t really make sense to spend $600 for the tub now knowing we want to get rid of the combo at some point. $1,800 is a lot more but it’s better than $600 now plus $1,800 later.
  • Fix vent (ours currently vents into the attic)
  • Install drywall where needed
  • Purchase and install new toilet where plumbing exists
  • Build and tile shower – will likely use a curtain for now but would love to replace with frameless glass down the road
  • Remove carpet and carpet pad in sink area
  • Install new floors throughout (tile vs. vinyl)
  • Paint
  • Make over vanity (or replace depending)
  • New light fixtures
  • Replace mirror (maybe)

Here are things I would love to do this year but not sure if we’ll be able to do them at this moment:

  • Remove wall between toilet/shower area to make one room instead of two (depends on if it’s structural)
  • Remove reach in closet (depends)
  • Rough in future tub???
  • Install a second sink to make a double vanity – this would likely mean replacing the existing vanity and sink
  • Add a linen closet
  • Move toilet

And here are some super long term wants that won’t happen this year unless we win the lottery:

  • Look into possibility of raising the ceiling
  • Install free standing tub
  • Add a chandelier over the tub
  • Add a window above the tub
  • Add recessed lighting
  • Marble hex tile floors

Exterior Walkway

This is one of those projects that we made way worse before it got better. It was originally made up of brick pavers which we had planned on replacing with 12″x12″ pavers all the way down and through the patio area behind the garage. We ended up changing our minds on the pavers (or more accurately, I changed my mind and Kyle is thankfully very laid back) after pulling up all of the poorly laid brick pavers. We threw a bunch of mulch down just to have something but it was a weedy, muddy mess for years.

img_5854

img_5849

We finally started clearing out the walkway and monkey grass and we poured these 4′ x 4′ pavers and filled in with gravel.

img_3942

We abandoned this area once it got cold a couple of years ago and then we just never made it a priority to get back around to it until this year.

I’m not 100% sure what I want to do here but we need to back fill more gravel near the gate and I know I want to string cafe lights to make it more inviting. I either want to do planter boxes with flowers or some sort of retaining wall situation, just not sure exactly what yet. Once it warms up we’ll start figuring out exactly what we want to do between the current walkway and the property line.

Downstairs Hall Closet

This will hopefully be a relatively quick project. When we moved in, I tore the shelves out and doors off of this closet, built a bench and a box for our shoes, and hung a couple of hooks for bags and jackets.

closetba

Great idea but it honestly just became a dumping ground so we decided to tear it all out when we were planning on expanding/opening up our laundry room.

img_9836

Long story not nearly short enough, the framing in this house is weird and we’re not confident that removing the little wall between the laundry room and this closet is possible, at least not without redoing other framing and it’s really just not worth the money and time to do that. SO the closet stays but we plan on making it more of a built in cabinet where we will keep all of the food and other necessities for the pets.

Foyer

I swear we have tried to finish the foyer every single year we’ve been in this house but this is the year!

entry2

entrybefore

This is what we’ve done so far: paint the walls gray, remove all of the trim, replace some of the trim, install new floors, switch out the door, paint the walls white, switch out the light fixture, add a mirror and entry table (which is actually a working vintage stereo). We also built a barn door to close off the laundry/closet/half bathroom.

4bbddb45-d372-4b0b-9ad1-81f389e21737

This is what we plan to do:

  • Get another new door. The one we put in is a beautiful, very old door which was painted with lead based paint. We painted over it to seal it but our dog Barley continues to scratch it and has now gotten down to the lead paint. We are going to replace it with something that fits more with the style of the house and isn’t potentially dangerous to our health.
  • Maybe replace the current light fixture with a recessed light
  • Patch and spot paint the ceiling where we removed a post
  • Get a new barn door track (the one I bought originally isn’t long enough so the door won’t fully open)
  • Get a plant stand for our snake plant
  • Figure out something for the window sill that Barley can’t damage while standing on it and barking at/protecting us from other dogs, neighbors, delivery people, stray cats, her own shadow, the sound of her tail thumping the floor that she mistook for a car door, a sound that came from the tv, and/or absolutely nothing.
  • Add batten trim in the foyer and down the hall because we love how it turned out in the dining room (this time with white trim and white walls above)
  • Install/patch/sand/paint crown moulding
  • Touch up paint

So that’s the plan! It’s hopefully going to be a big year for this house of ours and I can’t wait to finally knock some projects off the list. We also have one project on stand by in case we decide to start something new this year but I’ll talk about that more later if we decide to take it on.

One Room Challenge Fall 2019: Week Six!

November 7, 2019

Week Six! We all know what that means…it’s reveal day!

ORC-Guest-400white

It has been both the slowest and fastest six weeks ever and I’m so ready to take the weekend off before jumping back into our kitchen. Did I mention we’re hosting Thanksgiving and our kitchen is only 70% finished?

ANYWAY, that’s another post for another day. Today, we’re here to talk about the dining room. Before I show you how it looks now (which I’m going to say is 95% finished: the final ceiling trim and painting the ceiling can’t happen until the kitchen is ready for the same treatment and the pantry door isn’t installed yet among other small things), let’s take a trip into the past.

This is what our dining room looked like before we bought the house and it has looked more or less like this for the last 6.5 years that we’ve lived here.

dining room

I did paint it a far too purple toned gray at some point, Kyle installed a new light fixture, and we filled it with a hodge-podge of furniture but otherwise, this room sat pretty much ignored.

img_2034

As beautiful and inspiring as that space was, we decided to try to make it over and add a pantry to the room for the Spring One Room Challenge earlier this year. Now to be completely honest, this was probably not a good decision on my part. I was struggling really hard after my dad passed in March and my grandfather’s health was quickly failing (we lost him shortly after) and I was really just trying to distract myself from grieving. Long story very short, participating in the Spring challenge probably added way more stress than I needed at the time and it actually lead to us having to demolish our entire kitchen which you can read about here if you feel so inclined. To say it has been a stressful and emotional year would be a giant understatement.

This is about as far as we made it for the Spring ORC:

img_2661

Actually, I do think we got the new door to the garage installed but you get the idea.

We talked about finishing the kitchen and taking a break from projects for the rest of the year but when the Fall One Room Challenge rolled around I felt like it was the perfect opportunity to give ourselves a hard deadline for the kitchen, dining room, and pantry. Obviously the kitchen didn’t make the cut but the dining room has come so, so far and I am so excited to share it with you guys! I am planning on getting some professional photos of this space done when our kitchen is finished so for now I just have my always stellar iPhone photos.

img_0990

img_1047

img_1061

img_1037

img_1077

img_1040

The wall to the right used to be solid with no doors and now there are two: one to the garage on the left and one to our new pantry).

img_0995

Don’t worry about the fact that I didn’t paint the crown molding all the way to the ceiling; we have one more piece of ceiling trim that will go in once we’re ready to do the same in the kitchen and it will hide the unpainted parts. I also need to paint and install the pantry door and paint the garage door but those are two projects that got cut for the ORC.

The entrance to the pantry used to be in the hall and was used for our cats’ litter box. This is what it looked like before:

img_0948

We opted to move the entrance to the dining room side and use the space for storage for our serving/entertaining dishes, specialty baking tools, and a couple of small kitchen electrics.

I’ll be 100% honest and say we chose to plank the walls and ceiling with tongue and groove pine because it was a lot easier and faster than hanging and finishing drywall. I love how it turned out though and it’s reminiscent of the paneling in other parts of our house.

img_1076

It’s killing me that these are so dark but it’s a cloudy day and the room doesn’t get a ton of light at this time of day anyway. I cannot wait to get my friend Christina in here to work her magic!

This chandelier from World Market is one of my favorite parts of the room.

img_0945

We actually bought this during Black Friday last year to install in our bedroom but we never got around to it and once I painted the walls and trim in here, I knew our chrome pendant wasn’t going to work in this space anymore. I love the wood beads with the dark green trim.

The cabinets are actually Billy bookcases from IKEA and still need to be trimmed out but we wanted to see how they felt in the room before doing too much to them. They hold all of our drinkware and some of our overflow dishes that we don’t keep in the kitchen as well as some seasonal items.

img_1078

We looked into buying actual cabinets for this area but the price difference is huge and we needed something shallow anyway so these 11″ deep bookcases are perfect.

img_1014

I have had such an incredible response to this (removable!) wallpaper and trim combo. If you’ve been around a while, you might remember that I actually bought this wallpaper for the laundry room which I was going to pair with dark green cabinetry. Unfortunately, we weren’t able to expand the laundry room like we wanted and this wallpaper has just been sitting rolled up on top of a cabinet. We knew we were doing a faux board and batten painted green in here and we had planned on just painting the top half of the wall white. The more I looked at it, the more I knew how much that color (Behr Northern Glen, by the way) and that wallpaper (which you can find here) were meant to be used together. Shout out to Young House Love for using this same paper while I just happened to be on the hunt for a large print wallpaper. I had been looking for something with lemons because I liked the idea of yellow and dark green but the minute I saw the oranges I was sold. The wallpaper is actually a wall mural meant to be hung vertically across about an 8ft span but we were able to add more trim and hang it horizontally without needing to match up any seams in most areas.

I think I found about 6 different popular greens on Pinterest when I was trying to find the right color for the dining room and kitchen cabinets. I got samples of all of them and none of them were “the one” so I headed back to Home Depot to get two more samples mixed up. While those were being mixed, I decided to browse the paint chips and got a sample of Northern Glen on a whim. It just goes to show that while the internet can provide a wealth of inspiration and information, sometimes a random paint chip at the hardware store is what you really need.

img_0999

We’ve had these chairs almost as long as we’ve lived here. They were a gift from my in-laws and they are so sturdy and gorgeous. We’re planning on getting a new dining table at some point and one of my requirements is that the new table has to work with these chairs.

We needed some sort of hutch to put by the new entry to the garage to use as a place to set down our keys and wallets after coming home each day. When this beauty was posted on a local vintage shop’s Instagram, I snatched it up. It fits perfectly in this space and offers extra storage.

img_1004

Speaking of coming home each day, this view coming into the house is sooooooo much better than walking into a 5×6 cramped box that’s 2/3 taken by a washer and dryer and not one but two doors.

img_1012

Although, this view is more realistic:

img_1071

And the view coming down the hall from the front door isn’t too shabby either:

img_1082

So, that’s it! Like I said, there are some small finishing things left to do but this is the first time in four One Room Challenges that we’ve actually finished our space enough to reveal it and I could not be happier!

Let’s just take a look one more time.

Before:

dining room

After:

img_0990

Please make sure you go check out the other reveals here. There is some seriously insane talent out there!

One Room Challenge Fall 2019: Week Five

October 30, 2019

Holy crap it’s week 5 which means only one week left until the challenge is over!

ORC-Guest-400white

Per usual, we are behind but I think if we really buckle down this weekend we’ll be able to knock it all out. Here is what I had hoped to accomplish over the weekend:

  • Finish trim install
  • Finish caulking/spackling/sanding all trim
  • Paint all trim
  • Prime ceiling
  • Paint ceiling
  • Install cabinets
  • Paint garage door
  • Clean pantry door
  • Paint pantry door
  • Install wallpaper
  • Install new light fixture
  • Install blinds

And here is how we’re looking now:

  • Finish trim install
  • Finish caulking/spackling/sanding all trim
  • Paint all trim – In progress. Hoping all of the dining room painting is done by end of day Thursday (except the ceiling trim which we will be finishing later)
  • Prime ceiling – putting this off until we are ready to paint the ceiling in the kitchen since the two spaces are connected
  • Paint ceiling – putting this off until we are ready to paint the ceiling in the kitchen since the two spaces are connected
  • Install cabinets
  • Paint garage door – hoping to be done with this Thursday
  • Clean pantry door
  • Paint pantry door
  • Install wallpaper
  • Install new light fixture
  • Install blinds – Not sure on this one. Need to get the wallpaper up first to see how I feel about the blinds. Might opt for a different window treatment.

It doesn’t look like we got much done and we definitely did not get as far as I had hoped but things are about to go fast. I’ve got a first coat up on the rest of the trim and there are just a couple of spots on the garage door that need to be sanded before I can paint. I’m also hoping I can talk Kyle into installing the new light fixture tonight since we won’t be painting the ceiling yet and we installed our cabinets over the weekend which was the last thing we needed on the long wall before wallpaper.

img_0548

We also attempted to start the wallpaper after OG’s bedtime and before our dinner one night but it’s definitely going to take longer than we thought it would and we don’t want to rush through. We did get one piece up but we accidentally cut it a little wonky and it’s now just the slightest bit too short so we’ll have to remove it and put up another piece. Womp, womp! But it looks so good! I cannot wait for all of it to go up.

img_0547


If I can get all of the painting finished up Thursday and we can get the new light installed, that will leave the weekend to install the wallpaper and finish everything we need to do in the pantry and then next week will just be finishing up all of the little stuff, cleaning it all up, and taking pictures.

So here’s the dining room to-do list for the last week of the challenge:

  • Paint all trim
  • Paint garage door
  • Install wallpaper
  • Install new light fixture
  • Install blinds

As for the pantry (which we haven’t touched during the challenge yet):

  • Re-route electric (we found a live wire hiding behind a wall when we demoed but we will be able to just remove it instead of having to re-route it)
  • Finish installing paneling on the walls
  • Install paneling on the ceiling
  • Prime and paint new paneling
  • Spray paint brackets for final shelf
  • Move two existing shelves
  • Install final shelf
  • Patch/paint nail holes
  • Install trim
  • Caulk/spackle/sand trim
  • Paint trim
  • Paint bottom shelf? Not sure on this yet since I think the white would just get scuffed up.
  • Paint door frame
  • Clean door
  • Trim door (it’s slightly too wide)
  • Paint door
  • Install door

Be sure to check out all of the other incredible room transformations right here!

One Room Challenge Fall 2019: Week Four

October 24, 2019

Week Four!

ORC-Guest-400white

In true ORC fashion, we are not on schedule to finish so I think we’re going to cut the finishing work on the kitchen and focus solely on the dining room and pantry. Still planning on finishing the kitchen by Thanksgiving (hopefully before!) since we’re hosting but since we still have floor to ceiling cabinets to plan and build, four shelves to drill out, sand, and oil, lots of trim work that hasn’t started, and only two weeks left until reveal day, I don’t think it’s happening.

That’s okay though because progress is chugging along in the dining room and I’m optimistic it will be finished! I don’t have many progress photos today since we’re still working on trim but once that’s finished things should very quickly start falling into place.

We had planned on getting our storage cabinets from IKEA last weekend but they ran out of stock the day our friend Tom was going to pick them up for us. We live about 1.5 – 2 hours away from IKEA so we couldn’t just hop in the car when they re-stocked a couple of days later. Kyle is planning on heading up tomorrow assuming they aren’t out of stock again and we should be able to get those put together and up this weekend.

Here’s the one progress photo I have from this week: partially painted trim! I got the first coat of green up on the first wall and I’m hoping to get the second coat up today and the rest of the installed trim caulked. I am in LOVE with this color. It’s Behr Northern Glen if you’re wondering and it’s the same color we painted our kitchen cabinets.

img_0216

This is what I’m hoping to get done this weekend:

  • Finish trim install
  • Finish caulking/spackling/sanding all trim
  • Paint all trim
  • Prime ceiling
  • Paint ceiling
  • Install cabinets
  • Paint garage door
  • Clean pantry door
  • Paint pantry door
  • Install wallpaper
  • Install new light fixture
  • Install blinds

This would basically finish off the dining room and give us a week to finish the pantry which doesn’t need much more work.

Be sure to check out what everyone else is up to right here!

Fall One Room Challenge 2019: Week Three

October 16, 2019

Week Three! Halfway there…

ORC-Guest-400white

We had planned on working on the kitchen shelves this week but we switched gears and decided to focus on finishing the dining room first. Our priorities are now: dining room, kitchen, and then if there’s time we’ll finish the pantry. I feel like these 6 weeks are flying by faster than normal.

Over the weekend, Kyle and his dad were able to get some of the trim work done in our dining room and I finished caulking all of the tile and started filling in nail holes.

img_0024

We also scored a free door for the pantry thanks to my in-laws. I’ve actually been in love with this door for years and I’m so excited we found somewhere to use it and that they didn’t mind giving it to us. It used to hang in their basement/crawl space but wasn’t actually used for anything. It needs a good cleaning, some paint, and a replacement pane of glass but it’s almost perfect for the pantry.

Today, Kyle took the day off work and his dad came over to work on even more trim in the dining room.

EEEEEEEEEEEK.

It all looks a little funky now because of all of the white over the green. Once we fill all of the nail holes and seams and caulk everything, I can start painting it all green and then wallpaper won’t be too far off.

Here’s how our dining room to-do list stands as of now:

  • Finish drywall (technically this is in the hallway so TBD if we’ll get to this)
  • Install baseboard
  • Install crown
  • Install window/door trim
  • Caulk all trim
  • Paint all trim
  • Patch ceiling
  • Prime ceiling
  • Paint ceiling
  • Buy and install pantries
  • Trim out pantries
  • Install wallpaper
  • Install new light fixture
  • Install new blinds
  • Curtains? Not sure if we’ll hang curtains in here or not
  • Clean/paint pantry door. Replace pane of glass if we have time.
  • Install pantry door
  • Clean hutch
  • Change out outlets (from white to black)
  • Spray paint a/c vent cover (black)

It looks like a lot and it is, especially considering there’s still plenty to do in the kitchen/pantry, but I think the trim was probably the biggest/most time consuming part of the dining room so having that done is a huge burden lifted.

That’s it for this week! Be sure to check out what the other guest participants are up to right here!

Fall One Room Challenge 2019: Week Two

October 9, 2019

Week Two!

ORC-Guest-400white

Admittedly, I don’t have much progress to share this week. We are slowly working on finishing up caulking and cleaning the tile in the kitchen and prepping the open shelves for finishing/installation. I’m hoping to get a lot of trim work done this weekend so I can start caulking all of that which I estimate will take me approximately 3 years and 47 days.

Since I don’t have much progress to share today, I thought I’d share a couple of mood boards and a little more detail for the two spaces so you guys can see how they work together.

First up, the dining room:

img_9786

The main elements in this room will be the green board and batten wall treatment and the orange grove wallpaper. The green color we chose (Behr Northern Glen) isn’t showing true to color on this screen but the shots on my Instagram are pretty close.

We’ve also decided to purchase this IKEA Billy bookcase to replace the dresser we’re using now (which doesn’t look like it’s going to hang in there much longer anyway). Here’s a shot of the dresser (and a sneak peek at the wallpaper and green together); it’s just a cheap Target dresser that we’ve had probably as long as we’ve lived in this house. What you can’t see is the severe bow at the bottom of the dresser from the weight of all of our crap.

img_9209

We’re planning on building the bookcase out a bit and trimming it so that it looks built in. We’re going ahead and splurging on this for two reasons: 1) it gives us even more storage than what we have now which is never a bad thing and 2) it keeps us from having a seam in our wallpaper. Since this paper is meant to be hung vertically, I don’t think we’d be able to match the pattern and blend the seam. The bookcase will go about where the dresser is now and then there will be wallpaper on each side of it.

Right now we have a chrome light fixture that I really like but I want to use some more natural elements in the space so we’re going to install this World Market chandelier that we purchased for our bedroom in here instead.

We’re also keeping our existing dining room table for now which we built using plans by Ana White. Eventually, we’ll get a new table and put our farmhouse table outside but for now we’re using what we already have since the table I want is $1,000 and ain’t nobody spending that on a table right now.

There’s really not much to talk about in the kitchen and since we’re making our own counters, I didn’t include any on the mood board.

img_9792

We replaced all of our cabinets with these Lowe’s Project Source drawers and painted them the same green we used in the dining room. We also carried the same laminate floors from the rest of the downstairs into the dining room and kitchen.

As for the tile, we installed the white penny tile counter to ceiling on both cabinet walls which was a major labor of love and a learning experience. For instance, we learned that our kitchen isn’t square but to be perfectly honest we probably could have guessed that one for ourselves.

img_9794

The black and white tile is majorly out of my comfort zone. I tend to get tired of patterns really quickly (ask Kyle how many bedspreads we’ve gone through since we moved in) but I just really wanted to do something bold…because I guess green cabinets and wallpaper with giant oranges on it aren’t bold enough? ANYWAY. Kyle (AKA the one who makes my house dreams come true) built a custom hood frame and then I tiled it with the patterned tile. It’s probably one of my favorite projects we’ve ever done and once it’s all clean and caulked I will post about it (there’s already a picture on my Instagram feed of it before grout if you can’t wait until next week).

This space has been partially finished for SO LONG now and I’m really ready to get it wrapped up. Here’s what we’re trying to accomplish at a bare minimum this weekend:

  • Finish installing shelf rods
  • Drill holes in shelves
  • Sand shelves
  • Oil shelves to match counters
  • Caulk tile
  • Continue cleaning tile (do as I say, not as I do: DO NOT let grout haze sit for weeks on end because it will have gotten nice and cozy and will not want to leave)
  • Trim out the doors to the deck
  • Trim out the wall next to the counter by the family room
  • Trim out the garage door
  • Add additional trim to the window
  • Fill nail holes
  • Start caulking

Be sure to go check out what the other guest participants are up to right here!

Fall 2019 One Room Challenge: Week One

October 2, 2019

I didn’t intend to take such a long break from the blog but life got busy as it tends to do. I’ve been in a major funk pretty much since my dad passed in March and we spent a week in Montana last month and haven’t really worked on the house much since getting back. Kyle and I decided earlier this year when our kitchen had to be gutted unexpectedly that we wouldn’t participate in the Fall One Room Challenge. Yet, here I am posting about Week One.

ORC-Guest-400white

If you’re not familiar, the One Room Challenge happens twice a year and involves making over one room in 6 weeks. There are both featured and guest designers and projects range from small room re-dos to full blown renovations. You can read more about it here and be sure to check out the other guest participants here.

Just in case you think I’ve gone fully off the deep end, we are not making over an additional space in our house. I decided the 6 week “challenge” timeline will hopefully be good motivation to finally finish the dining room and pantry which we started for the Spring ORC and our kitchen which has been stuck at 80% finished for a couple of months now. So while we’re technically tackling 3 spaces, we have a giant head start since we’re over halfway done with each space. That means in 6 weeks I will finally (ahem, hopefully) be revealing our kitchen, dining room, and pantry!

So let’s catch up shall we? We’ll start with the kitchen which looked like this when we moved in:

Listing_Kitchen

Listing_KitchenFridge

Listing_KitchenSink

Listing_KitchenStove

The very first thing we did when we moved in was remove all of the doors and paint all of the cabinets white. I don’t have many pictures from the White Era because spoiler alert: I still hated the kitchen.

kitchen

It pretty much looked like the above picture, cluttered counters and all, for over 6 years. Then, we discovered a lot of old water damage and mold while putting in new floors throughout the kitchen and dining room for the Spring ORC. Shortly after we made that discovery, it looked a lot more like this:

img_4054

Sorry that picture is so blurry. Nothing but quality here, folks!

If you’ve been following along, you know we had less than a shoestring budget to rebuild our kitchen but eventually, we got to about here:

img_6103

Side note: Eventually we’d like to change out all of our appliances and replace these counters with white quartz.

The kitchen pretty much still looks like this except we have a sink and faucet now and we finished all of the tile on the stove wall among other things. I’m going to be obnoxious and hold out on you guys a little because the stove wall is looking pretty dang good if I say so myself and I want to wait until further in the challenge to show that progress. If you follow me on Instagram, you’ve already seen some of what I’m talking about.

Here’s our To-Do List for the kitchen (as far as I can remember anyway):

ORC 2019 Kitchen To Do.JPG

If you’re looking into the kitchen from the family room (which is the view in that picture just above), the dining room is to the right. It’s basically one long, narrow space. What we use as the dining room was actually marketed as a “Florida room” and the space we use as the family room was meant to be the dining room. Make sense?

dining room

Not much to look at, right? All we did when we moved in was paint the walls gray (which looked more like purple), build a dining table, throw in some vintage chairs, and shove in some other random furniture. We tried to finish the dining room for the Spring ORC but that didn’t happen (see: kitchen mold disaster). Here it is at the start of the Spring ORC:

img_2034

And here it is right now in all its messy glory:

Still lots to do and we’ve actually added projects we hadn’t planned on doing originally. I’m glad the big stuff is done though – removing all of the tile took weeks since we could only work a little at a time and adding the two doors were big projects, too.

ORC 2019 Dining To Do

Which brings us to the pantry! Originally, this was just a closet in the hallway. You can see the door in the two “before” photos for the dining room. Not sure what it was used for before we bought the house. Maybe the pantry? I don’t have a true before but here it is after we ripped the disgusting musty carpet out and laid down some loose tiles that the previous owners left.

cat closet before

We installed a cat door and shoved the litter box in shortly after moving in and then a few months later we added fun cat things like a scratching wall (it was a cheap jute rug that we stuck to the wall where that velcro is below) and carpeted shelves.

img_0948

I can honestly smell the closet just looking at this photo. Ick. During the Spring ORC, we ripped everything out and I do mean everything:

eccac702-ef32-4ad8-8777-ee20fe3fa16e

We also moved the entrance to the dining room side of the wall and closed in the old opening. I planked most of the walls with tongue and groove pine and painted it white. I haven’t finished planking the walls or ceiling and the doorway still needs to be finished. We installed shelves to have somewhere to put our kitchen stuff but we actually need to move them around so I’ll also have some holes to patch. We have not organized the pantry at all yet, just threw everything in there to get it out of the way. Here’s how it looks today:

Luckily, there’s not too much we have to do but I’d like to leave enough time/money to make it pretty and organized so we’ll see what I end up with.

ORC 2019 Pantry To Do

So that’s it! It’s our year to host Thanksgiving which is coming up quickly so we really do need to find motivation and get this done. I don’t have a great record finish One Room Challenge spaces (I’m 1 for 3 in case you’re wondering) but I’m determined to turn that around. Make sure you check out the other guest participants right here and the featured designers here!

Update on our on-going Kitchen Renovation

July 24, 2019

It’s been a few weeks and progress in the kitchen is still creeping along. I don’t actually expect us to be done until the end of August but considering we only work on it on the weekends while wrangling a toddler (several weekends of which have been busy with other obligations) and we’re doing everything ourselves, I think we’re doing pretty good. My plan for the rest of this week/weekend is to finish installing the tile, install the sink and faucet, and hopefully finish grouting the tile. We also still need to prime the ceiling but we’re both dragging our feet on that one.

Since my last post, we have finished installing the floors, finished all of the cabinet painting, installed the drawer hardware, finished removing all of the old crown molding, started installing new trim, painted the french doors, and installed all of the counters (minus the waterfalls).

Here is a sneak peek but I’ve been posting our progress on Instagram (mostly on Stories):

img_6106-1

And here’s a master list of everything that needs to be finished. Or at least, everything I can think of.

  • Prime/Paint Ceiling
  • Finish gluing up/trimming waterfalls
  • Condition/sand/oil waterfalls
  • Install waterfalls
  • Finish installing trim (crown, door, base)
  • Patch/sand/paint trim
  • Install shelf brackets
  • Tile stove wall
  • Grout stove wall tile
  • Install sink/faucet
  • Build hood
  • Tile/grout hood
  • Clean/seal all tile
  • Caulk tile
  • Cut/stain shelves
  • Install shelves
  • Build pantries
  • Build cabinet over fridge
  • Trim out pantries/cabinet
  • Paint pantries/cabinet
  • Clean/put away dishes
  • Decorate


Kitchen Progress

July 1, 2019

You guys, the kitchen is getting so close! I mean, it doesn’t look like it and the reality is that we won’t really be done-done until August or maybe even September but it’s at least usable. Well you know, minus a sink and a range hood. And counters and drawers and a place to store our pantry goods and…ya know what? It doesn’t matter because it feels usable. We can use our oven and our dishwasher so it’s basically like a functioning kitchen. Like a functioning kitchen in a college dorm. Or like an RV kitchen. We’re getting there.

img_5290

We have floors in the dining room for the first time since March/April. We still have 6 or 7 rows left to install but FLOORS! I’m hoping to finish them up over the next night or two.

img_5289

Kyle glue up all of the counters over the weekend. We went through a billion different ideas for counters and decided on stacked plywood. They are looking so good already!

img_5188

We opted to spring for birch plywood and we’re planning on using a medium brown danish oil to stain/seal them. I’m hoping we can get them cut and installed this week and start on the finishing process (sand, seal, sand, seal, sand, seal, until the oil doesn’t soak in anymore).

Once the counters are done we can start on tile! I feel like that’s really where the big transformation is going to happen. Until then, I still have 6 drawers to sand and paint and 4 cabinet doors to prime, sand, and paint plus we have to prime and paint the ceiling which neither of us wants to do.

Here’s what I’m hoping we can accomplish this week:

  • Finish installing floors
  • Finish painting drawers/cabinet doors
  • Remove crown molding in Dining Room
  • Prime ceiling
  • Paint ceiling
  • Paint french doors
  • Install drawer hardware (drawers that have cured for 7+ days)
  • Start putting dishes away where possible
  • Install counters
  • Cut out sink opening
  • Stain counter waterfall pieces
  • Start the finishing process on the counters

Kitchen Renovation – The Plan

June 18, 2019

So now that you’re all pretty much caught up on what’s been happening, I thought I would talk just a little bit about our plan for the space starting from the floor and going up from there.

  • Floor: We are going to carry the laminate that’s currently in the rest of the house into the kitchen/dining room. I was a little concerned about laminate in the kitchen but I think it will be fine and we’re installing it so that the last row will go by the sink/dishwasher so it will be easy to pull up and replace if we have a leak in the future.
  • Cabinets: We are going to have drawers all the way around the kitchen with the exception of the lazy susan and the sink cabinet which will both have cabinet doors. We picked up the cheapest, in stock drawers from Lowe’s and will work with them for the next few years until we can afford to upgrade (remember, this remodel was not planned and we’re trying to stay as cheap as possible so that we have to finance little to none). We’re going to paint them the same color green that we are putting on the lower half of the dining room walls so that we have one color all the way around the bottom half of the space (the two spaces make up one big room). I ordered some drawer pulls from Amazon but they are coming straight from China so it’ll be another few weeks – a month before they get here. On either side of the fridge we’ll build floor to ceiling pantries with a cabinet over the fridge.Project Source 18-in W x 34.5-in H x 24-in D Brown/Tan Oak Drawer Base Stock CabinetImage result for behr northern glen


  • Counters: The counters are what I’m most nervous about. We are going to attempt DIY-ing some wood counters using 2x lumber. If they end up working out, I’ll give you guys more details about how we built them. I’m really hoping we can start them this weekend or next week but we’ll see! Depends on how cabinet installation goes.
  • Walls/Upper Cabinets: We are going to be tiling the entire wall above the counter on both sides of the “L” cabinet layout. We’re using white penny tile with a light-medium gray grout. We decided not to use upper cabinets and are going to use open shelving instead. I’m really not a fan of open shelves but Kyle likes the idea of them; I think they can be pretty but thinking about how much animal fur is floating around our house at any given moment just kind of grosses me out thinking about it on our dishes. We’re compromising by installing shelving but using it for cook book storage, canisters, and glasses that we can keep overturned (assuming our cats don’t climb up and start knocking stuff off which is a major possibility).Style Selections White 11-in x 13-in Porcelain Penny Round Mosaic Wall Tile (Common: 11-in x 13-in; Actual: 12.75-in x 11.5-in)
  • Stove hood: We had a stainless steel under cabinet hood which we will be using as an insert into a new hood cover that we are planning on building out. Most of the time, hood covers are built out of wood or they can be drywalled/plastered to match the surrounding walls. We decided to try something a little different and we’re going to tile the hood cover using this patterned tile. I’m usually not huge into patterns but I thought this might be fun.MSI Cigno 8 in. x 8 in. Glazed Porcelain Floor and Wall Tile (5.33 sq. ft. / case)

I think that’s pretty much it. We also removed the giant 70s/80s rectangle fluorescent light and replaced it with 3 recessed lights and I’m planning on painting the doors to the deck green to blend in with everything else. Then of course there’s all of the small stuff like changing out the window trim, plumbing the sink, and installing the faucet I picked up on clearance before we even knew we’d be redoing our kitchen.

Here is what I’m hoping we’ll accomplish over the next two weeks (mostly weekends):
• Install drawers
• Prime/paint drawers (already started)
• Finish smoothing the ceiling
• Build first of 3 counters (more if we can)

  • « Previous Page
  • 1
  • 2
  • 3
  • 4
  • …
  • 22
  • Next Page »

About

the house on the hill blog
Southern made. Lover of animals. Married to a New Englander. Slowly renovating our 1970s home.
Read More

Archives

Copyright © 2023 · Coffee & Dreams Theme by Themes Hub

Copyright © 2023 · Coffee and Dreams Theme on Genesis Framework · WordPress · Log in


Loading Comments...